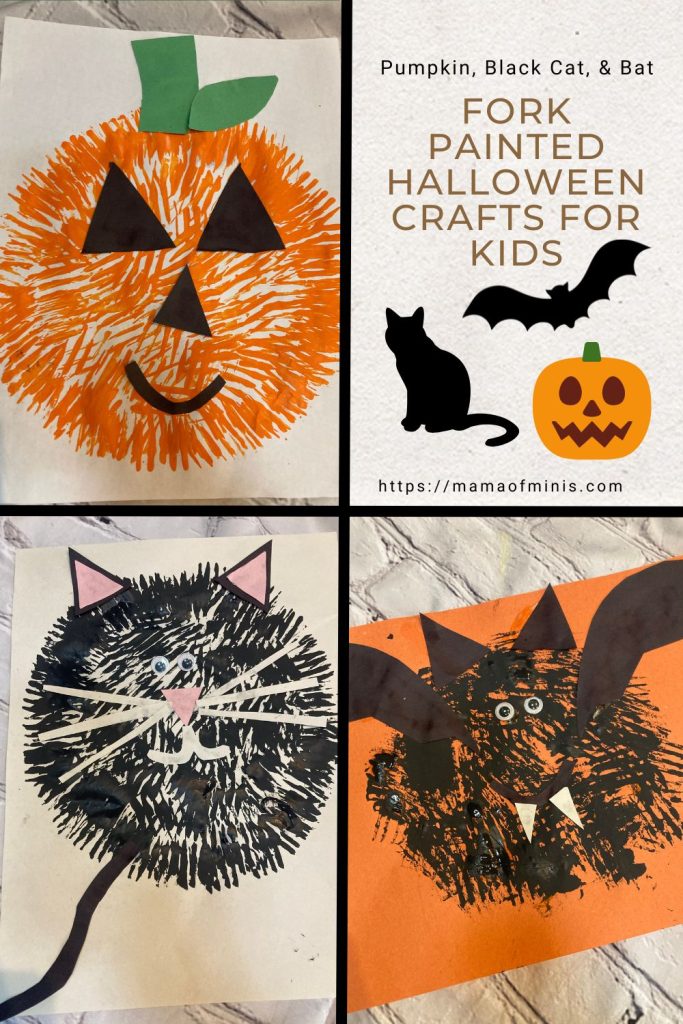
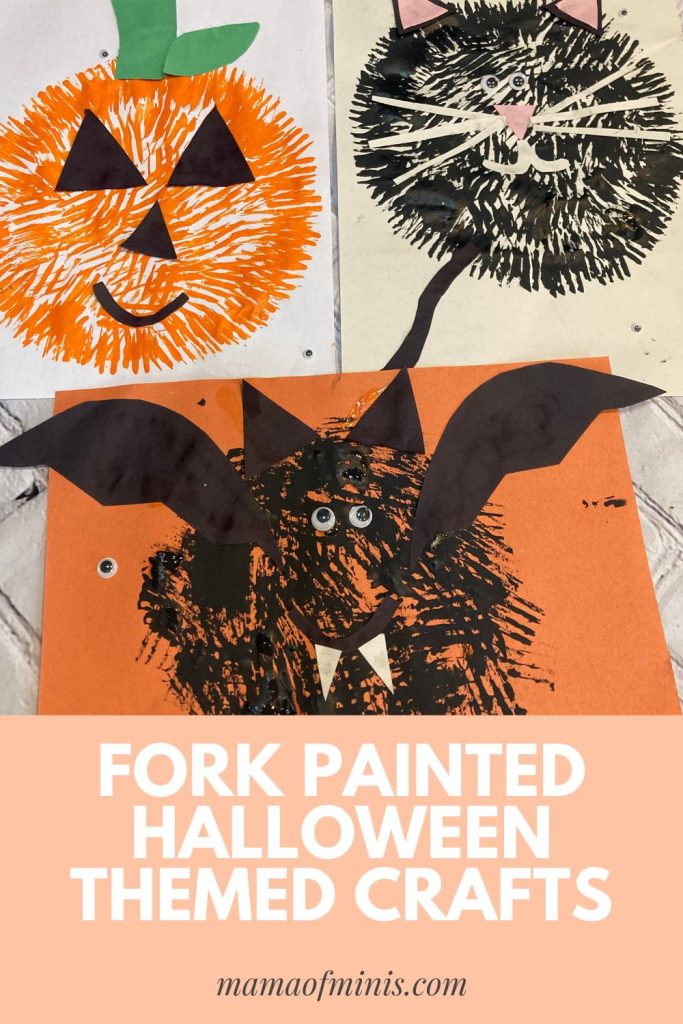
3 Cute Fork Painted Halloween Crafts
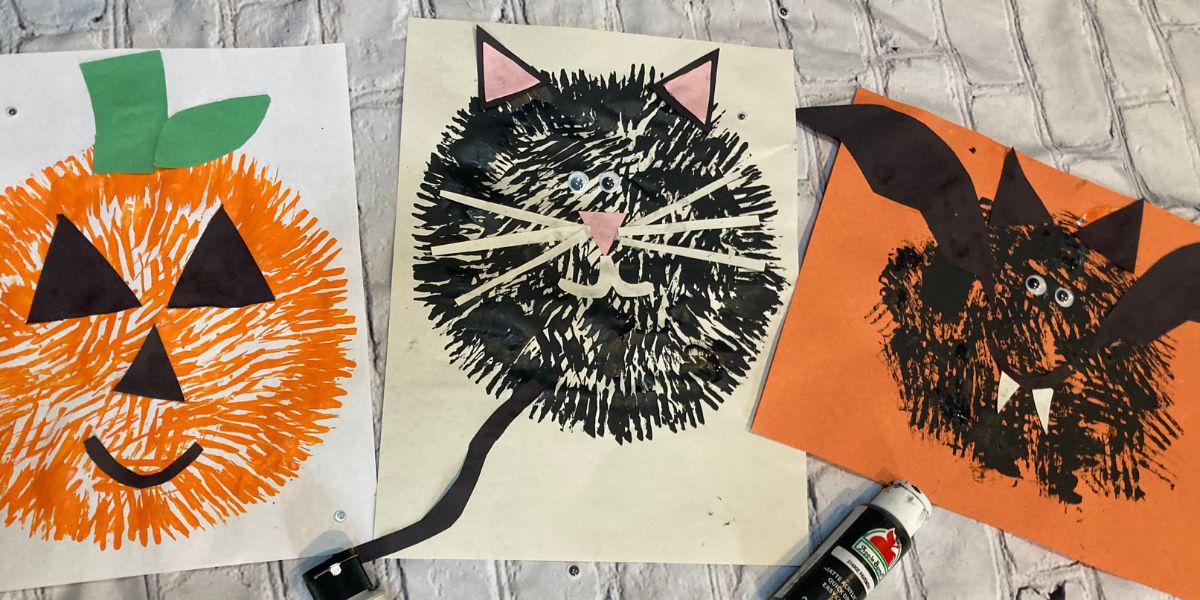
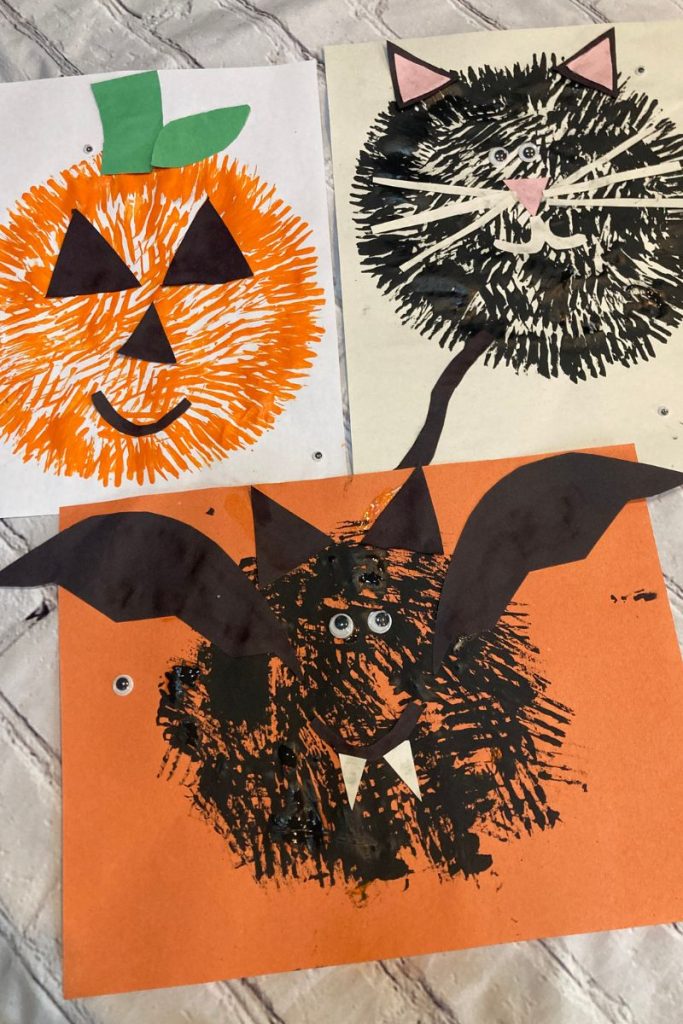
These three cute fork painted Halloween crafts use a fork, construction paper, and washable paints to make a black cat, jack-o-lantern, and bat crafts. They make the perfect easy Halloween crafts for kids of all ages.
Each and every one of these three fun Halloween crafts turn out so unique and cute once finished. Children will be able to use their creativity to create a fun circle or oval shape with a fork and paint and add embellishments to make them look like cute Halloween characters once complete.
Head down for directions to make these 3 fun Halloween fork painted crafts.
Fork Painted Halloween Crafts Tips for Success
*When creating these fun Halloween crafts you start with the painted circular base. Kids will dip the back of a fork into a pile of paint (you can use washable or acrylic paints). Then they should push the fork down onto the paper.
You can draw a light circle outline with a pencil so kids know where to try to push their paint-filled fork down. However, you can also allow children to free-hand and fork paint the whole paper or a circle shape as best as they can. The Halloween images will look great either way.
*You may need to model how to cover the back of the fork in paint and push it down on the paper. Younger children may try to draw their fork on the paper too. Either way, they will turn out great as long as you make sure to cover the paper with enough colored paint.
*If making these crafts with younger children you may need to draw and cut out the construction paper details and have them glue them on in the spots they think they should go. You can also draw the construction paper pieces on the paper and have the children cut them out if they are capable. Older children can do the drawing and cutting all on their own.
*If you have the construction paper pieces ready and cut out ahead of time you can stick them down onto the paint while it is drying and will not need a glue stick. If you let the fork painted base dry first you will need to glue the construction paper pieces down with a glue stick or glue bottle.
Halloween Fork Painted Crafts
Materials:
- Construction Paper
- Washable or Acrylic Paints
- Scissors
- Glue Stick
Jack-O-Lantern Craft Directions
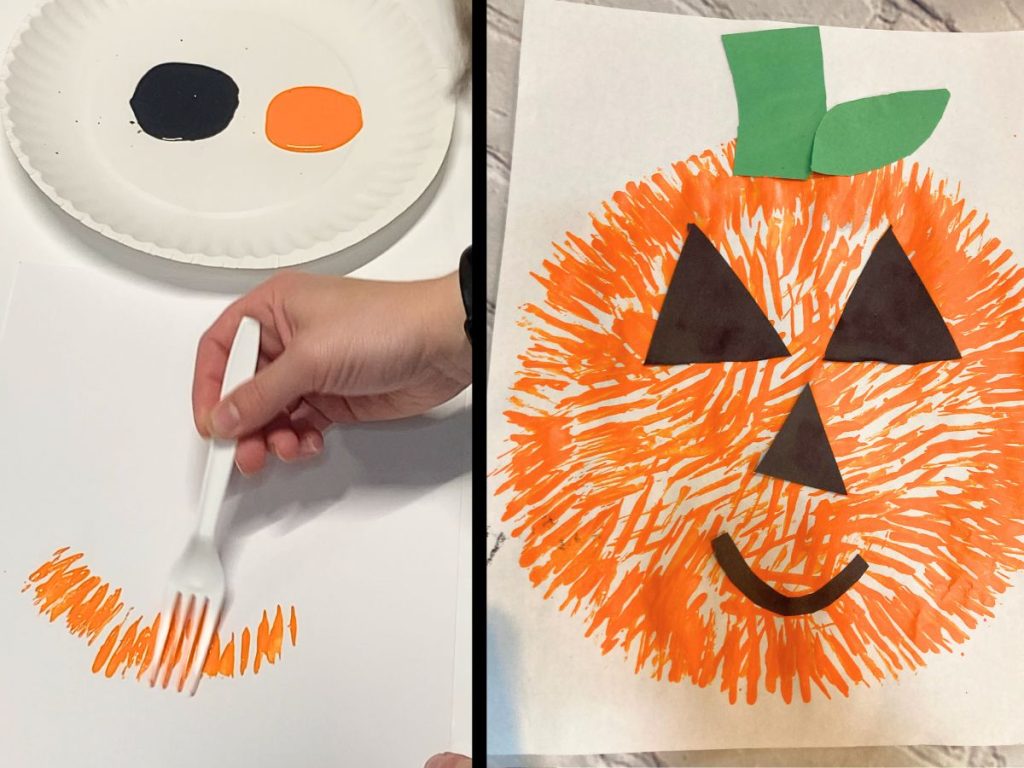
- Dip a plastic fork in orange paint and push your fork down onto a white piece of paper. Repeat this process multiple times until you’ve created a filled in circular shape with the orange paint fork marks.
- Cut out two large black triangle shapes and one smaller black triangle shape from construction paper. Glue them down on the top and middle of the circle to create the jack-o-lantern’s eyes.
- Cut out a small green rectangle from construction paper and glue it to the top of the circle to create the stem. Cut out a green pointed oval shape for the leaf and glue it right next to the stem.
- Using a black permanent marker draw on a smile underneath the nose to complete your jack-o-lantern.
Black Cat Craft Directions
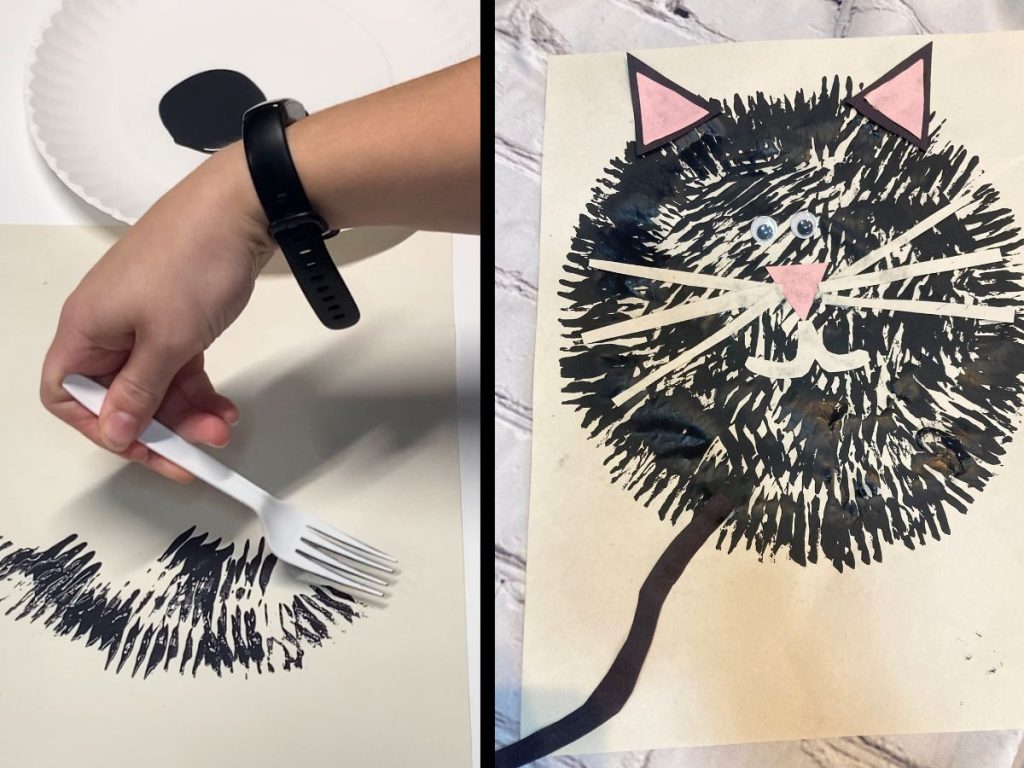
- Dip a plastic fork in black paint and push your fork down onto a white piece of paper. Repeat this process multiple times until you’ve created a filled in circular shape with the black paint fork marks.
- Cut out two large black triangles from construction paper and two smaller pink triangles from construction paper. Glue the pink triangles inside of the black triangles to make the cat’s ears. Glue both of the triangles to the top of the black circle.
- Cut out a smaller pink triangle and glue it to the middle of the black circle for the cat’s nose.
- Cut out six long and skinny paper strips from white construction paper to make the whiskers. Glue three to each side of the cat’s nose.
- Glue on two googly eyes or two white circles for the eyes above the cat’s nose.
- Cut out a rounded w shape for the cat’s mouth from white construction paper and glue it underneath the nose.
- Cut out a wavy black paper strip for the cat’s tail and glue it to the bottom corner of the cat.
Black Bat Craft Directions
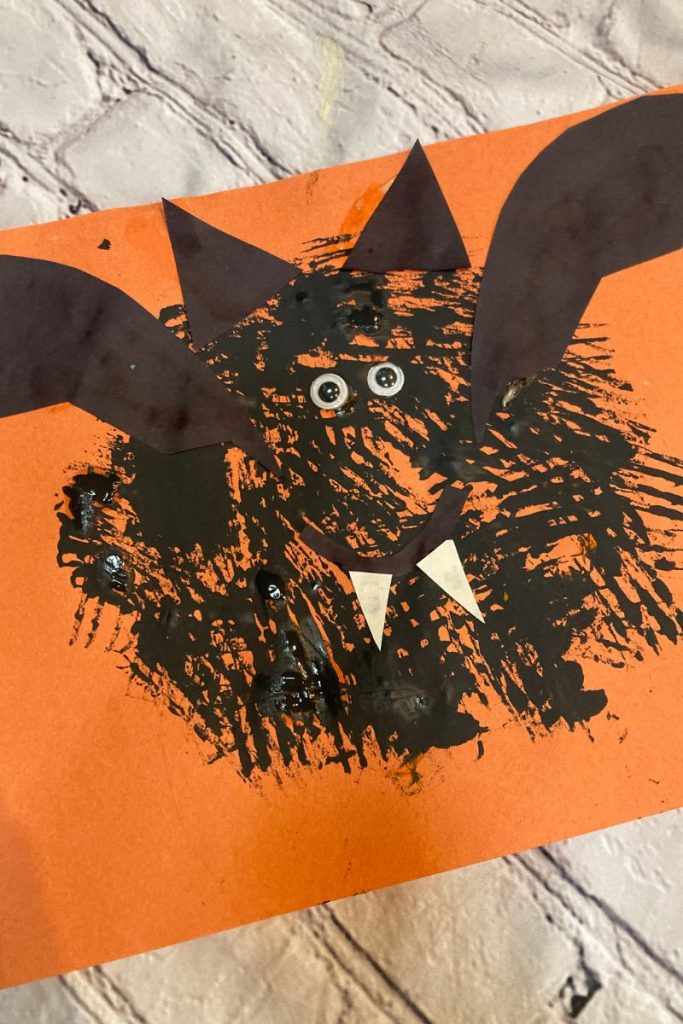
- Dip a plastic fork in black paint and push your fork down onto a white piece of paper. Repeat this process in a circular shape multiple times to create the bat’s body.
- Cut out two large black triangles from construction paper for the bat’s ears and glue them to the top of the bat.
- Cut out two half circles from black paper for the wings. Cut zig-zags into the straight edge of the half circles to complete the wing shape. Glue a wing to each side of the bat.
- Glue down two googly eyes or cut out two white circles from construction paper for the eyes and glue them down to the middle of the bat.
- Cut out a black construction paper U shape or draw on a large U shape with a permanent marker for the bat’s mouth.
- Cut out two small white triangles and glue them to the bottom of the u shape to make the bat’s teeth and complete your bat craft.
Additional Fun Halloween Themed Crafts and Activities for Kids
These fork painted Halloween crafts make the cutest Halloween crafts for kids of all ages. Check out some more of our favorite Halloween crafts and activities below:
- Monster Pupper Crafts for Kids – Using a paper bag make cute and unique Monster puppets that can be used for pretend play.
- Tape Resist Painted Pumpkins – Cover a pumpkin in masking tape or painter’s tape in a fun design or shape. Paint over the rest of the pumpkin with different colors of acrylic paint. Remove the tape to reveal your fun designs for a fun alternative to pumpkin carving.
- Lacing Spider Craft – Using a paper plate, paint, and pipe cleaners create a fun spider shape with legs that are perfect for beading a fine motor practice.
- Marshmallow Ghost Craft – Using large marshmallows, stamp white paint on paper, add eyes, and a mouth to create fun ghost shapes on black paper.