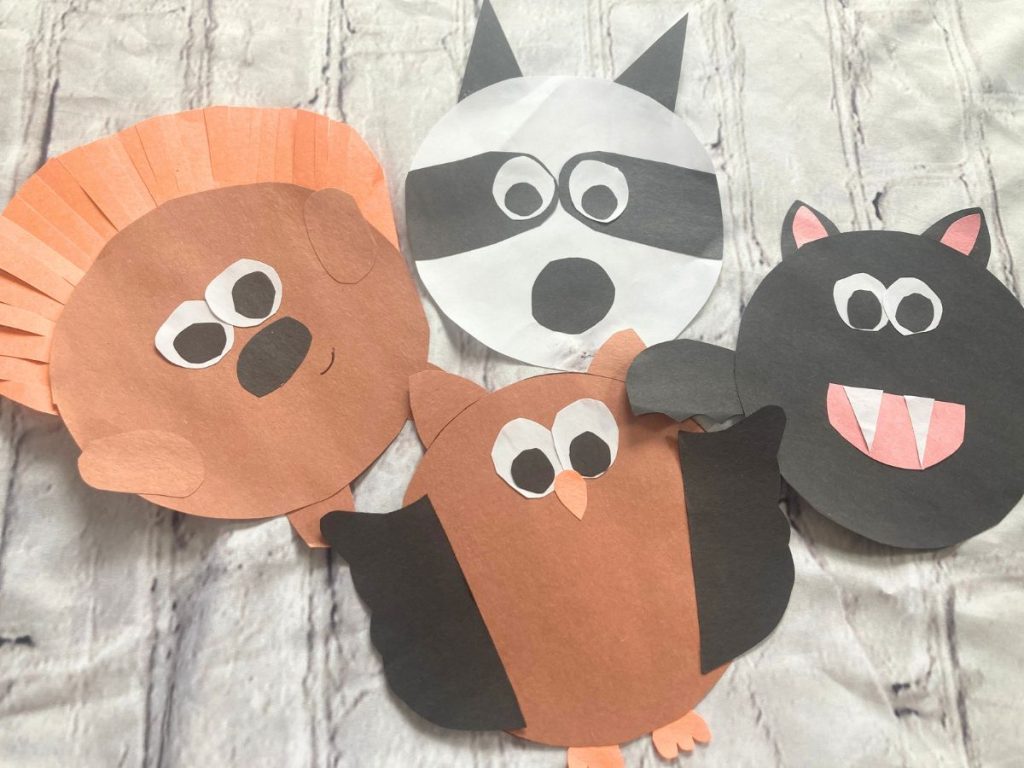
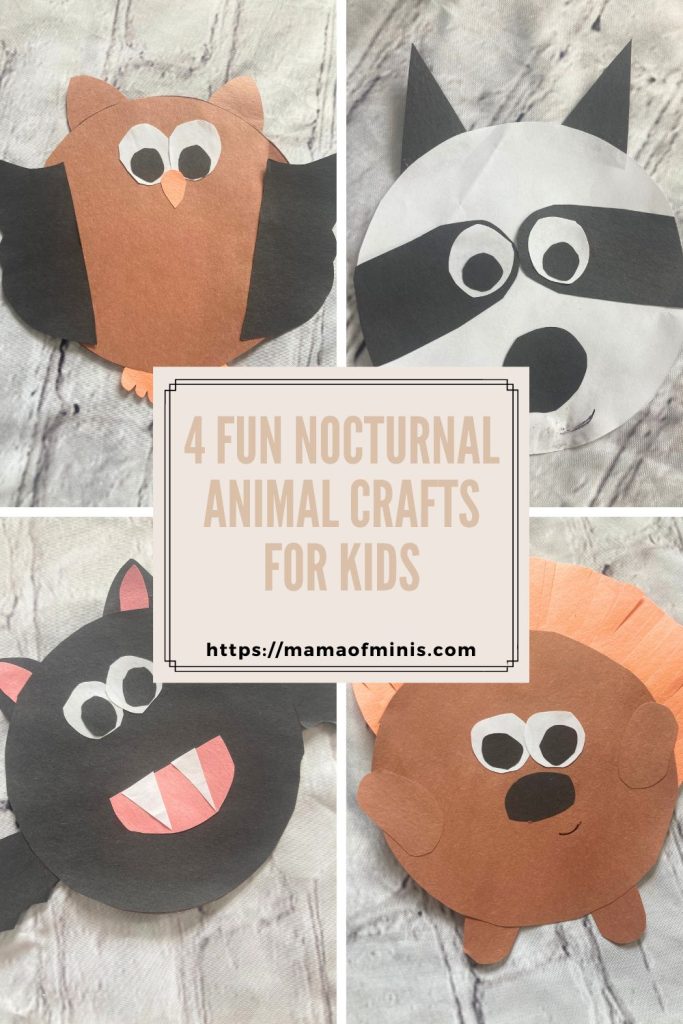
4 Fun and Adorable Nocturnal Animal Crafts for Kids
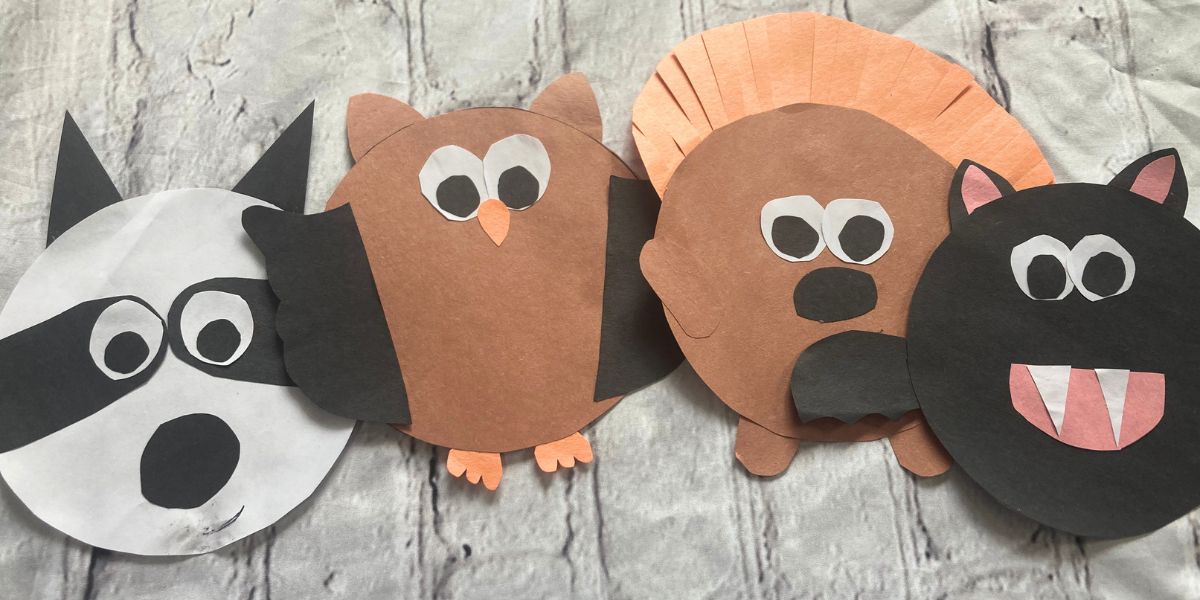
These 4 fun and adorable nocturnal animal crafts for kids are the perfect night animal crafts. Directions to make a bat, raccoon, hedgehog, and owl crafts for kids of all ages.
These cute animal crafts use only construction paper and a glue stick as well as an optional bowl for a tracer. They are super simple to make and turn out so cute. Make one of these night animal crafts or make all four if desired.
These nocturnal animal crafts use the same bowl tracer shape as these farm animal crafts as well as these forest animal crafts. Be sure to check them all out and make all of the animals.

Night Animal Crafts Tips for Success
- Make just one of these or make them all. Each one will take about 5 minutes with a total of 20 minutes if you make all four. Once complete you can leave them separate or mount them on a piece of construction paper and add a writing prompt (for older children).
- When making these crafts you can use a child’s sized bowl to trace and cut out the base of each of the animals.
- Younger children may need help cutting out the pieces. You can prep the pieces for them and they can glue them together. As children get older you could draw the pieces for them to cut out and glue together. Even older children can look at the example and cut out the size and shape pieces necessary on their own.
- To make these four crafts you will need black, pink, white, and orange construction paper. You will also need a glue stick, and scissors. You can choose to cut out and finish with construction paper eyes or use large googly eyes for an added level of fun.
Nocturnal Animal Crafts for Kids
Materials Needed:
- Construction Paper (orange, pink, white, and black)
- Scissors
- Glue Stick
- Googly Eyes (optional)
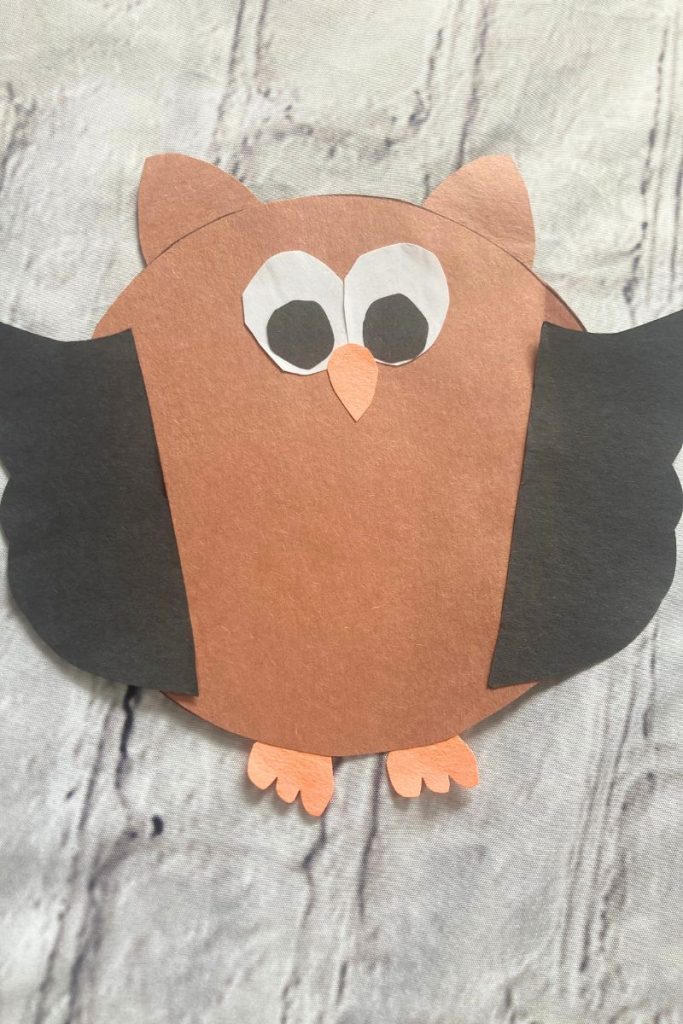
Owl Craft Directions:
- Trace around a child’s sized bowl on a brown piece of construction paper and cut it out.
- Cut out two brown triangles with rounded edges for the ears and glue them to the back of the top of the brown construction paper circle.
- Cut out two black or brown wing shapes. One side should be a straight line and then you should have bumps on the other side of the wing shape to make the “feathers.” Glue each of these to each side of the brown construction paper circle.
- Cut out a small orange teardrop shape for the owl’s beak. Glue it towards the middle of the owl’s body.
- Cut out two letter m shapes for the feet and glue them to the back of the bottom of the owl’s brown body for the feet.
- Cut out two small white circles and two smaller black circles for the eyes and glue them right above the owl’s beak to complete your owl (or glue on googly eyes).
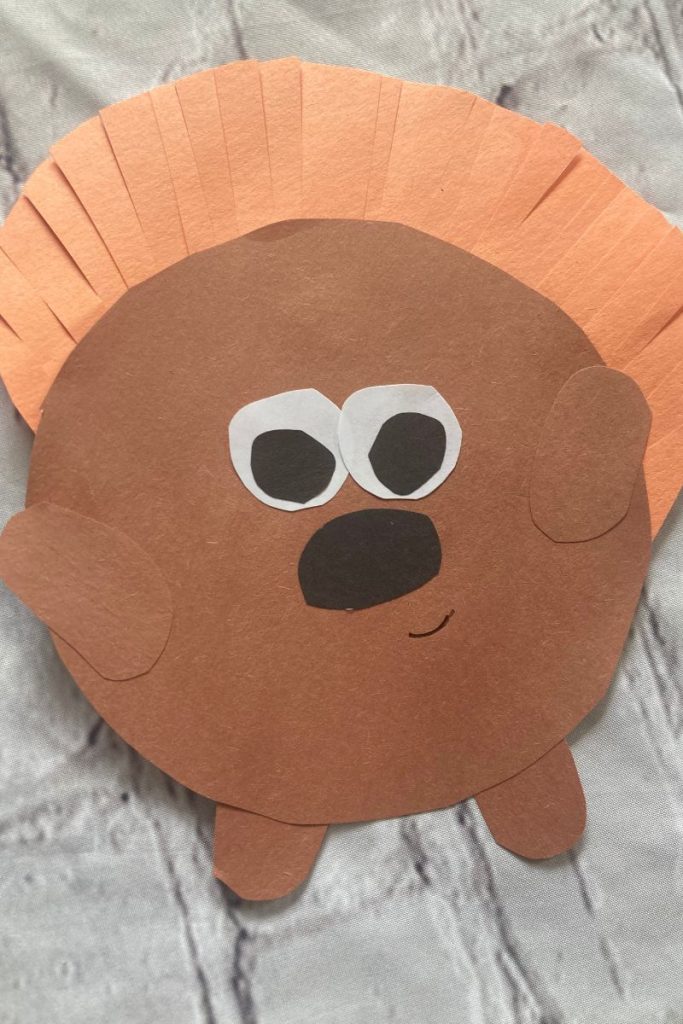
Hedgehog Craft Directions
- Trace around a child’s sized bowl on a brown piece of construction paper and cut it out to make the hedgehog’s body.
- Place your brown circle on top of an orange piece of paper and trace around the bottom half of your brown circle. When you get to the middle of the circle extend the circle you are drawing out about an inch around the top of the brown circle. Then cut it out. This is going to be the hedgehog’s spikes.
- Line up the bottom of the orange circle with the brown circle and glue it on. The orange will hang off of the top a bit. Cut straight lines in the orange all the way around the top of the orange paper. Each straight line should be about 1/4 inch apart and touch the top of the brown circle. This will finish the hedgehog’s spikes.
- Cut out two small brown ovals and glue them to each side of the hedgehog’s body to make the arms.
- Cut out another two small brown ovals and glue them to the back of the bottom of the hedgehog’s body for the feet.
- Cut out a small black oval and glue it to the middle of the hedgehog’s body for the nose.
- Cut out two small white circles and two smaller black circles for the eyes. Glue them together and glue the finished eyes just above the black nose of your hedgehog. (or add on googly eyes)
- Draw on a small mouth just underneath the nose to complete your hedgehog.
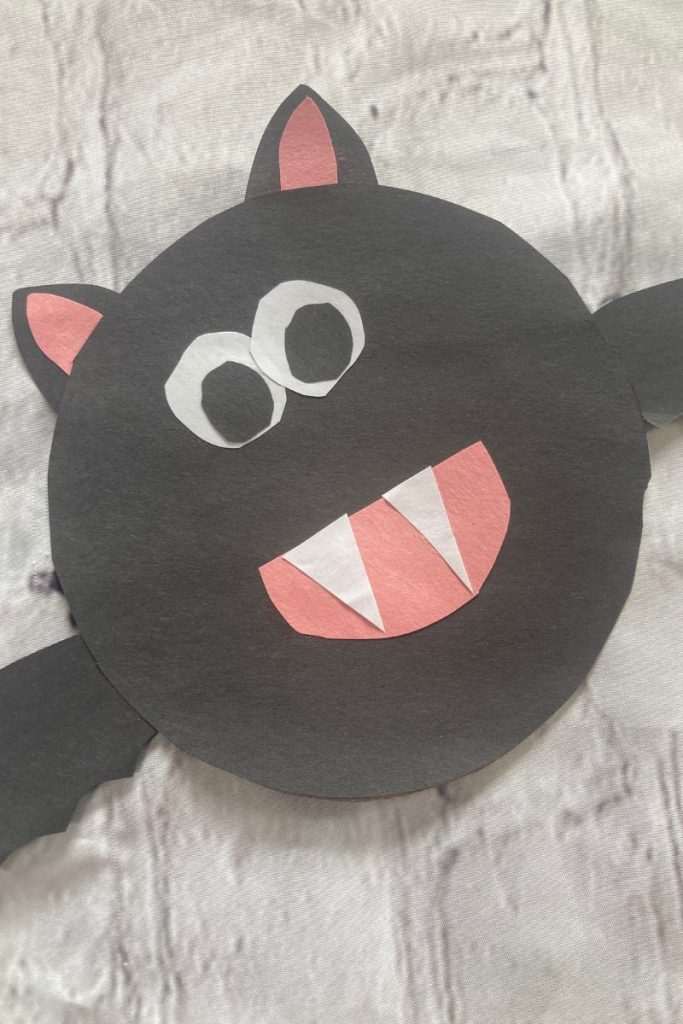
Bat Craft Directions
- Trace around a child sized bowl on a black piece of construction paper and cut it out to make the bat’s body.
- Cut out two semi-circles with a bumpy bottom to make the bat’s wings. Glue one onto each side of the bat.
- Cut out a pink semi circle and glue it to the middle of the bat’s body for the outside of the mouth.
- Cut out two small white triangles and glue them inside the top of the semi-circle to make the bat’s teeth.
- Cut out two rounded triangles from black paper and glue them to the top of the bat to make the bat’s ears.
- Cut out two smaller pink triangles and glue them inside the black triangles to make the bat’s ears.
- Cut out two small white circles and two smaller black circles. Glue them together. Glue them towards the top of the bat’s body to complete your bat craft.
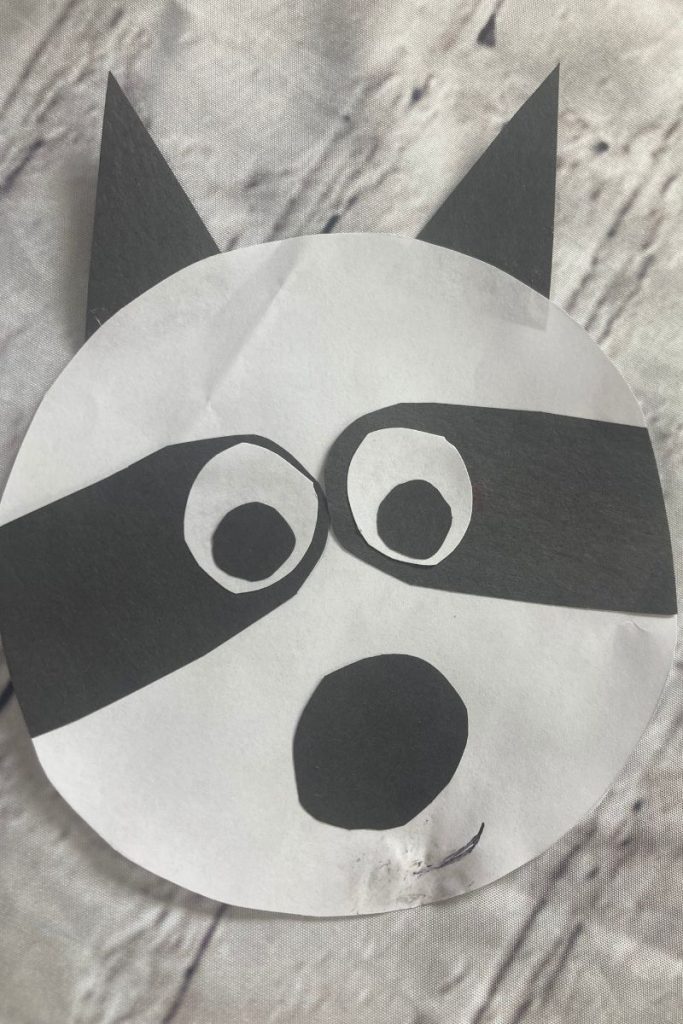
Raccoon Craft Directions
- Trace around a child sized bowl on a white piece of construction paper and cut it out to make the raccoon’s body.
- Cut out two long black ovals for the sides of the raccoon’s face/eyes. Angle them in towards each other and glue them each on the sides of the raccoon. They should just barely touch when they meet in the middle. Cut off the excess black that hangs off of the white circle.
- Cut out two black triangles and glue them to the back of the top of the raccoon’s face for the ears.
- Cut out a black circle for the raccoon’s nose and glue it towards the bottoms of the large white circle.
- Cut out two small white circles and two smaller black circles and glue them together to make the eyes. Glue each eye to the inside of each of the black oval shapes.
- Draw on a small underneath the nose.
Additional Fun Circular Animal Shape Collections
All four of these fun animals use the same bowl as a base to start it. Check out these other fun animal collections that use the same bowl as a base to start as well: